HOW TO UPLOAD HIGH RESOLUTION PHOTOS ON FACEBOOK
This website uses affiliate links, meaning: at no additional cost to you, I earn a small commission if you click-through and make a purchase. As an Amazon Associate I earn from qualifying purchases. I only feature products that I believe in and use.
Your support means the world to me and allows me to host this website. Thank you!
WHY DO PHOTOS LOOK BAD ON FACEBOOK?
Posting and processing images on Facebook has been a problem for me for quite a while. Pretty much all my social and photographic activity ends up on that platform and in the absence of more physical wallspace for prints, my Facebook wall is my only real artistic outlet.
How frustrating to find that Facebook is scrupulously compressing my images into nasty, crunchy low detail files. It's a problem all us photographer's face.
We want to show the world our best work but unfortunately, the world is on Facebook...
So, how to fight back?
None of what follows is going to mean your images will be perfect on Facebook but they may well look a lot better than they did previously.
HOW TO UPLOAD THE BEST POSSIBLE PICTURES TO FACEBOOK
Add extra brightness. Facebook has a white background that will make your images look darker and bleed them of colour.
Don’t compress your images - Facebook will compress the image a second time!
Export them at full 300DPI resolution
Use a JPG Format at 100% quality
Make sure the longest edge is exactly 2048px
Save the sRGB Colour Profile into the Image
Sharpen your photograph for screen
Use a Vertical Crop if possible.
ADD EXTRA BRIGHTNESS & A LITTLE SATURATION
Facebook has a white background which will bleed the image of brightness. Your image will look darker against a white background.
This is why most photographers use a dark grey / black background on their websites, this boosts the appearance of brightness and saturation.
DON’T DOUBLE YOUR COMPRESSION
There are a whole raft of blogs and articles out there which spend a lot of time telling people to compress their images when exporting for web use to around 70% quality.
That's good advice for posting to your website or to a Wordpress blog because the file size will be much smaller and load much quicker and you definitely want your website to look good and load quickly.
However, it doesn't make a positive difference for Facebook because all that will happen now is that Facebook will compress your already compressed shot even more!
I tested this extensively on Facebook. I uploaded a maximum quality image and a 70% 72DPI image to facebook on a standard group timeline. I then downloaded each image to compare them.
I found that the previously uncompressed image had been compressed by Facebook and was now just 22% of the original size. However, the pre-compressed image was 20% of the full resolution original. Small gains but a gain nonetheless. Comparing the newly downloaded images to each other revealed that the uncompressed file was 11% larger than the pre-compressed file after Facebook had finished with them.
I went even further. I re-uploaded (is that a word?) the previously 70% compressed image to Facebook. It should have already optimised this image right? Facebook should have accepted it with open arms and done precisely nothing. Not a chance! The image got compressed further - another 11% in fact!
DON’T DOWN SAMPLE YOUR DPI
Ignore all the advice about downsampling your pic to 72DPI (to prevent theft). On Facebook, it will make no difference - they are going to compress the crap out of it anyway... Leave it at 300DPI and let Facebook handle it.
PNG CONVERSION
While it was certainly the case a while back that Facebook actually posted PNG's (they can't be compressed because they are a lossless format). Facebook now converts them to JPG's on upload and then compresses them further.
So while it was true that PNGs looked way better in the past, it is no longer true.
The theory behind exporting as a PNG and uploading to Facebook is that there will only be one stage of compression. This occurs in Facebook.
If you export to your hard drive in JPG, well that means you have already applied one level of compression in the conversion from RAW to JPG. Then, when Facebook gets the image, it will compress it again.
When I tested this myself, I found the difference to be undetectable. When I downloaded the Facebook converted PNG -> JPG file and compared it to the Facebook JPG -> JPG converted file, it was an identical size and looked identical to my eye.
So you can certainly try the PNG trick but I found no practical benefit. The downside is that PNGs are bigger and take up more space on your hard drive.
DIFFERENCES BETWEEN TIMELINE, GROUPS AND PAGES
There is a lot of information about the differences of posting to Timelines, Groups, Pages and Photo Albums (on high quality).
I have bought into this in the past but I decided to actually test the principles. I uploaded my sample images to my timeline, a group timeline, my page and using 'high quality' in an album.
Guess what? Each one of them treated the image identically. When downloading the image I could see no difference whatsoever between them when pixel peeping at 100%. More than this, they were all of an identical size - even the so-called 'high quality' image!
Bottom line. It seems to make no difference where you post.
BEST CROP RATIOS
Sizing images for social media is always a bit of a moving goal post. The best sizes change all the time! But there has been a major trend recently. More and more people are browsing the internet on phones and have you noticed what format the average phone is? I'll give you a hint, it's vertical.
Whereas it used to be the case that verticals were shrunk into tiny pics on Facebook (because we all used computers to look at these sites) now we use smartphones and the vertical/portrait image is back with a vengeance.
Sites like Pinterest & Tumblr all promote verticals and Facebook has just joined the club. You will note that your image will take up a far bigger piece of screen real estate (on phones it is called the viewport) than they did in the past.
If you can't post a vertical, then at least post a square. The 6x6, the Hasselblad medium format ratio, is back - thank Instagram for that!
WHAT SIZE PHOTO TO UPLOAD TO FACEBOOK?
Sizing your image is tricky. Larger images most definitely look better on Facebook, but they are at risk of theft. Not so much for print, but for use on websites and as web images.
I'm not sure there is much we can do about that other than to post small images that don't scale very well. The good news (or bad?) is that hardly anyone will click your image to view it full size anyway. The measly timeline width is all you are really going to need. And remember, most people will be looking at it on a tiny phone screen anyway.
Facebook actually publish what they do to images...Yeah, who knew! Check the latest advice here.
The current supported sizes for normal images are:
• 720px
• 960px
• 2048px (size will yield the best quality and fewest compression artefacts)
So I went ahead and tested 2048px v 1080px v 960px and I got some very interesting results.
When looking at the images side-by-side on the timeline I got a hint that the 2048px images were marginally better. You can't download the image from the timeline for comparison so I had to do it by eye.
When opening the images full size, the supported file sizes of 2048px and 960px looked better than 1080px but it was very marginal between 960px and 1080px.
When downloading the images from Facebook and downsampling it was absolutely clear that the 2048px won out over the rest.

The red box indicates an area I masked to show the noise sample from a 2048px image compared to a 1080px image after downsampling to 1080px - 2048px is clearly a lot better!

Is it me or is the lower 2048px image marginally sharper than the 960px in the timeline? Either way, there is very little in it when comparing timeline images.
The sizing conundrum is therefore clear. If you want the best quality and are less worried about theft, then 2048px wins. The other supported Facebook sizes of 960px and 720px come second and third. Avoid non-standard sizes, they appear to be resampled to achieve the nearest standard size in terms of equivalent DPI.
USE sRGB COLOUR PROFILES
Colour, as most photographers know is a very tricky problem. The reason is that our cameras can capture more colours than the internet (standard sRGB) can show.
More than this, we have absolutely no control over whatever cruddy and poorly calibrated screen our viewer is staring at. The typical issues with screens are normally to do with gamma levels and brightness as well as poor colour profiles.
But wait, there is more bad news! Much of the software that people are using to browse the internet is not colour managed either (and nor is much of the photo-browsing software loaded on our own computers - e.g Windows 10 Photos)!
One tip I can give you is to drag your JPG into a Mozilla Firefox browser window to see how it will display on the internet. You can do this because Firefox has the great advantage of being a fully colour managed browser.
When exporting your image from Lightroom or Photoshop ensure you have converted the colour profile to the internet standard sRGB.
This step is VITAL. The reason is to cater to two groups of users; wide gamut displays and tablet/smartphones. Wide gamut displays need to know that the image is in sRGB or they will not display properly - they will be over saturated.
Smartphones on the other hand do not generally recognise embedded ICC profiles. If we convert our images using Prophoto or Adobe1998 colour spaces they will appear under saturated on these devices. Converting to sRGB on export means that they will interpret the image correctly - even though they don't know the image is sRGB.
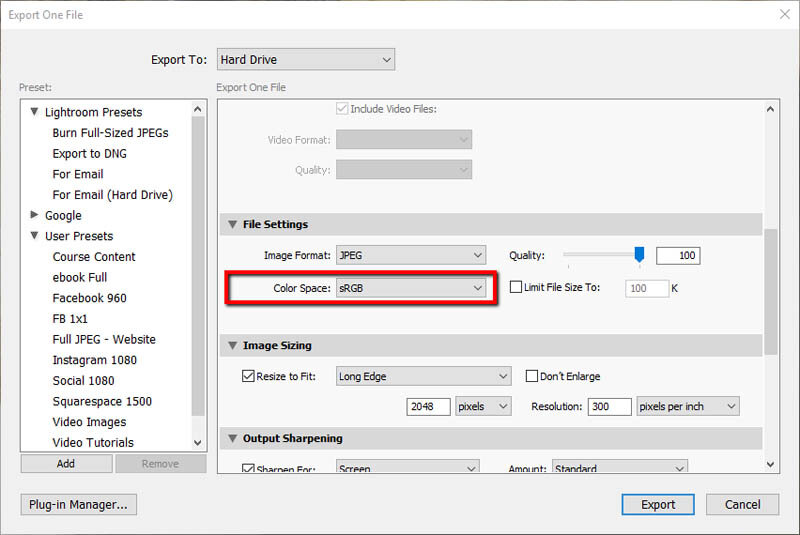
Here's the Lightroom CC dialog - Ensure your colour space is set to sRGB, the internet 'standard' if I can call it that.
Even when doing this, I have noticed that Facebook flattens colour and contrast. I'd advise testing a few posts on Facebook and giving your export settings a wee boost to saturation and contrast specifically for Facebook posts.
FACEBOOK LIGHTROOM SETTINGS
(Save this as an Export Preset)
If you didn't already know you can create specific export presets in Lightroom and then use these for all your Facebook images. You can even create collections that do this for you automatically once you have finished editing - but that, perhaps, is meat for another blog post.
Here's another tip Use a separate Lightroom Catalogue to manage all your social media output. I don't like JPG's cluttering up my processing catalogue.
I would also note that Lightroom omits settings for resizing and sharpening that are included in Photoshop. This added level of control may be important when reducing the size of the image, however, I have not actually tested it.
Your Lightroom CC settings should be as follows:


