Eliminate Noise at Capture by Exposing To The Right

Unsightly, image noise is a constant threat in wildlife photography. It's often caused by low light and the use of out-of-focus backgrounds. A lot of the time we concentrate effort on software that aims to reduce or remove noise after the picture has been taken. However, there is more we can do to reduce or eliminate noise at the point of capture.
What about minimising the noise at capture?
There are a number of ways to do this, one of them is to buy an updated camera model with lower noise characteristics.
This may sound like an odd way to deal with noise, but it seems to be a lot of people’s go-to method and is actively abetted by the happy camera marketers and affiliate-link reviewers!!
I feel we spend way too much time poring over spec sheets and reviews of cameras that are almost identical in terms of performance in the real world. Instead, we should concentrate on using the camera we have more effectively!
Using a camera 'effectively', simply means we should play to its strengths and avoid its weaknesses.
What is Digital Image Noise?
Sensor Noise
Sensor noise is always going to be present. It is a fundamental feature of the way digital sensors capture light and an exhibit of the quantum nature of the universe. In other words, some noise is unavoidable no matter what camera we have. The physicist, Werner Heisenberg, told us that back in 1927.
The degree to which a sensor can convert photons to electrons is called its' Quantum Efficiency (QE). No sensor can ever be 100% efficient and the very best consumer grade sensors are up to 60% efficient presently.
Digital sensors capture images by recording a level of electric charge based on the pattern of light striking an array of light-sensitive points. The camera then converts this information to 1’s and 0’s, fills in the gaps and saves it in a file.
The important things that need to be comprehended in this process are:
Light itself is not constant, it is actually delivered in packets called quanta made up of particles called photons. These arrive intermittently.
The sensor array is comprised of points that sample light and not all of the sensor area is covered. This means that some of the light is missed.
Sensors are not 100% efficient (and can never be) when they convert photons into electrons and levels of charge.
Each of these three characteristics limits the ability of the camera to capture all the possible information. Instead, the camera must use the information it does collect, to make a mathematical guess at the information it has not collected.
So far, the information the camera has collected relates purely to intensity or luminance. Colour comes later and with its' own particular issues.
Signal to Noise Ratio
Photons arrive randomly and when there are very few arriving, the number of photons compared to those making up the background ‘noise’ is very low. It becomes difficult to discern the signal from the background.
The ratio of photons to background noise is called the ‘Signal to Noise Ratio’ (SNR). We typically find low SNR in dark scenes and shadows and therefore these areas are prone to Sensor Noise caused by the inability of the camera to correctly build the rest of the image around the limited information it has captured in the dark areas.
Brighter areas of the image have more signal to work with (a better SNR) and consequently provide a better data set for the camera to build an image with.

Signal to Noise Ratio impact
Read Noise
Read noise is the noise introduced by the sensor electronics when converting the electric charges to data. If it is inefficient, it can often take on patterns, like the shadow banding exhibited by some cameras. There are ways to deal with Read Noise and some cameras even build it into capture.
Thermal Noise
Thermal noise is caused by heat energy as the conversion to digital information takes place. It can also take on fixed patterns, particularly if the sensor is not well shielded from other nearby electronic components. Thermal noise can build up in longer exposures and is also subject to the general temperature at the time the image was captured. If you look carefully at your metadata, certainly with Canon cameras, the sensor temperature at capture is recorded.
Colour Conversion, Noise, Demosaicing and the Colour Filter Array

Photoreceptive points convert photons to electrons and describe the intensity of the light and not the colour.
The majority of cameras in use today employ a Colour Filter Array (CFA) to derive colour information. The CFA works by filtering each photoreceptive point on a sensor by one of three colours: Red, Green and Blue. There is usually twice the number of green filters as our eyes are particularly attuned to greens.
If the light entering the camera at that particular point is a shade of green and the CFA also happens to be green, the camera can infer that the brighter intensity of the light at the photoreceptor, therefore, indicates that it is green. Conversely, if the light is green and the CFA is red, the light will be absorbed and the lower intensity will indicate that the light is not green but some other shade.
As a side-note, the CFA is often the cause of poor colour resolution (particularly with reds and greens) in digital images v film images. For example, taking a picture of red berries in a green bush at distance will often reveal fewer red berries in the digital image than in the film image.
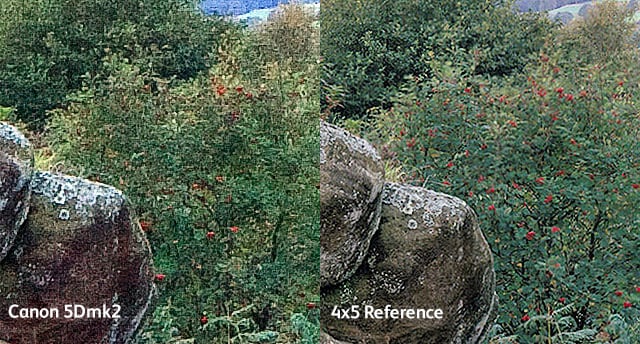
Source: Tim Parkin via Petapixel.com
comparing digital and film
This mosaic of individually coloured sites contributes one pixel to each of these colours (known as colour channels). Obviously, this information is incomplete because colours are never simply Red, Green or Blue but a mix. They are also never discrete pixels, colour and light are perceived as a continuum.
This means that the camera must artificially build the additional information from the pixel data it collects using interpolation. It essentially takes a mathematical guess based on the surrounding pixels. It is important to stress that a digital camera can never resolve a continuum - it is binary, on or off. It can only hope to resolve the colour, tone or detail to a point where our eyes can no longer tell the difference.
This process is known as Demosaicing and the reason we are talking about it here is that it contributes to the level of image degradation we encounter. Sometimes the process creates artefacts, particularly in JPEG files which group pixels into 8x8 blocks (basically bigger pixels) which, although saving space, can also make them 'crunchy' looking.
So the CFA and the demosaicing process contributes to Colour Noise and a change in the Colour Resolution. Tonality is also affected when converting CFA fitted sensors to Black and White. A dedicated black and white camera without a CFA will generally render a more accurate black and white source image.
Noise Manipulation in Camera
It should now be very clear that noise comes in two distinct guises: One is random and a feature of the universe. It is not possible to remove it from capture except by changing the conditions (settings) of the capture. The second type is introduced by the camera itself.
It should also be clear that manufacturers can manipulate noise characteristics in RAW files and JPEG’s during the conversion to digital and the save of the data. It is not uncommon to apply algorithms to RAW images some as simple as clipping the shadows to show pure black - a real scallywag’s approach!
Countless online tests talk about noise characteristics of various camera models without ever explicitly saying that the image is always manipulated to a greater or lesser degree. It’s essentially either a straight unmanipulated file or a ‘dumbed-down RAW file that is delivered to the photographer. This can be a good thing if you don’t want to bother getting the best from the image, or a bad thing because it stands in the way of achieving the best possible result.
The quality may also depend on our RAW conversion software. How good is it at reconstructing all those 1's and 0's into a picture? How good is our screen at representing its output - especially considering that most screens have a much lower resolution than the original image? These are very important considerations as they represent additional points where our image can be degraded and essentially have nothing to do with the camera or capture.
Reducing Noise by changing Image Capture Conditions
We talked about random noise generated by weak SNR’s. This noise can be mitigated to a huge extent by changing the capture conditions.
We want to boost the signal amongst all that noise right? We can do that by making the image brighter but we have to do it in a sensible way.
We cannot, for example just increase the ISO, all this does is increase the sensitivity/amplification of the sensor - it’s not going to add any more photons to the capture. The image may well become brighter but it will not reduce noise caused by a low signal.
Instead, we need to allow more time for the photons to hit our sensor. We have to increase any of total light in the scene (for example with flash or studio lights), exposure duration or aperture and so allow more intense light to strike the sensor.
Exposing to the Right
If we are not using another light source then this technique is known as ‘Exposing to the Right’ (ETTR) because it shows an accumulation of brighter information on our camera’s histogram on the right (brighter) side.
The camera light meter and our own eye might feel that the image is too bright, but the important thing is the higher SNR. From the better signal, we can construct better images and easily reduce brightness later using software. The aim is, of course, to produce a correct and representative exposure.
High Contrast ETTR
Before we start Exposing to the Right we need to understand that it is not appropriate for all conditions. Where there are very bright highlights and dark shadows in a high-contrast scene, it is not going to work. The highlights will blow. In this case, the photographer must choose to either expose for the shadows or the highlights or to bracket the shots.
Low Contrast ETTR
In a lower contrast scene that falls within the dynamic range of our sensor, we will definitely get a better image by improving the signal to noise ratio and exposing to the right. We can do this manually by either widening the aperture or increasing the length of the exposure or automatically by changing the exposure compensation on our camera.
How much to brighten the image depends on our scene, but generally, the best result is to set exposure about 2 stops below the point we blow the highlights. Note that the highlight alerts in our camera display can activate very early and are generally conservative.

Histogram exposed to the right without highlight clipping
Highlight Alerts
There are a few more things to note about highlight alerts on the back of the camera. First, the camera back image is a JPEG, the image will not show all the textural detail in the highlights available to a RAW. The highlight alert is based on the JPEG which usually means there is still to some room to expose for a brighter image.
Second, the image is a combination of the three colour channels. It is common for the highlight alert to become active where we have only blown one of the three colours. If possible, switch the histogram to an RGB version then we can see which colour channel is blown. Here are the links explaining how to do this for Canon and Nikon cameras.

A Histogram exposed too far to the right, large areas of the highlights will be clipped.
Expose to the Right - Practical Example
Let's look at a practical example. Many South African photographers will be familiar with this tree. It's a big camel thorn in the Kgalagadi. I photographed it on a bright overcast day. In the first image, I let the camera decide the exposure. It evaluated the sky and underexposed the tree.
In the second image, I exposed to the right, aiming to recover the highlights in the sky later on.
Exposure to the right comparison - Left (avg exposure camera meter) Right (compensated)

Camera Metered

With Exposure Compensation
detail - 1 stop exposure correction in post
detail - exposed to the right at capture
Here's another example that might be easier to see online - a caracal lying in shade with a bright background. The camera meter averages the exposure to preserve the highlights in the background. This is at the expense of the subject which is in shade.
Correcting the exposure in post, introduces artefacts and noise.
Camera Average Metered
Exposed to Right just before background highlights clip
Exposure corrected + 2 Stops in post - note lack of detail and added noise
Conclusion
If we understand what causes the noise we should understand why Exposing to the Right helps to reduce it. Increasing the light available to our sensor improves the signal and therefore the information available to produce an image.
If you enjoyed this post, please hit 'Like'

Use this cheat sheet to Expose to the Right


